EVICTED LAGSWITCH - Setup Guide
Follow four setup steps in order. Prepare the PC, launch the loader, then configure LagSwitch.
Before you start
Remove conflicting tools and prepare an archive utility before opening LagSwitch.
Programs to remove
Wireshark
Uninstall it before launching the loader.
Process Hacker
Remove it from the PC before setup.
HTTP debuggers
Close and uninstall traffic inspection tools.
Archive utility
Install WinRAR or another archive utility.
Need an archive utility?
Download the existing 4.01 MB file from MEGA.
Disable Windows Defender
Turn off Defender and any other antivirus before downloading or launching the files.
Manual method
Open Windows Security
Open Start, search for Windows Security, then launch the app.
Open protection settings
Go to Virus and threat protection, then select Manage settings.
Turn off real-time protection
Switch Real-time protection to Off.
Defender Control method
Download Defender Control
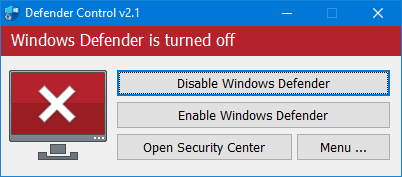
Extract the archive, run dControl.exe, then click Disable Windows Defender.
Install and launch
Download the loader, place it on a USB drive, and complete activation.
Prefer a video?
Open the existing installation video in a new tab.
Setup steps
Connect a USB drive
Insert a physical flash drive. If you do not have one, open the Virtual USB tab.
Copy the loader
Move
Loader.exeto the USB drive. The file may rename itself on first launch. This is normal.Run the loader again
After reboot, launch the loader from the USB drive. A new
.exefile with a random name will appear.Activate the new file
Run the new file and enter your activation key.
Finish setup
When the Evicted menu opens, click OK. The loader closes automatically. Safely eject the USB drive.
Configure LagSwitch
Start with the core controls. Open advanced settings only when you understand what they change.
Core setup
Open LagSwitch
Select LagSwitch on the main page.
Enable Desync
This is the main power toggle for the tool.
Bind a hotkey
Choose the key used to activate lag.
Enable Sounds
Sounds are inside the Desync function and confirm when lag turns on or off.
Choose traffic direction
Inbound
You stop receiving server updates. In the existing guide, this is used to make enemies freeze.
Outbound
The server stops seeing your actions. In the existing guide, enemies keep moving in the same direction.
Rust adjustments
Open the existing Rust page for additional gameplay-focused settings.
FAQ and errors
Search for the problem you see, then open only that answer.
Using LagSwitch
01What does LagSwitch do?
LagSwitch temporarily stops data between your PC and the game server. It can make your character appear to hover or teleport.
02What do the main controls mean?
Temporary runs for a preset time. Pressing toggles on each press. Hold works only while the key is held.
03What do Inbound and Outbound mean?
Outbound blocks actions sent to the server. Inbound blocks updates received from the server.
04How do timing settings work?
DurationMs: how long the lag lasts. Example: 1000 ms equals 1 second.DelayAfterMs: how long to wait before the next lag.- Existing recommended DurationMs: 900-1600 ms.
- Existing recommended DelayAfterMs: 500-1200 ms.
- Durations above 4000 ms have a higher kick risk.
- Delays below 100 ms may be unstable.
05What are KickBypass and Randomizer?
KickBypass splits one long lag into shorter lags. The existing settings are DurationMs 900-1300, DelayMs 5-30, and 1-5 iterations.
Randomizer adds a random amount to each lag. The existing range is Min 10-50 and Max 60-150.
06What are AutoRecovery, Logging, and Fake Lag?
- Logging records lag sessions for debugging or confirmation.
- AutoRecovery stops lag when a time or packet limit is reached. Existing values: 200-500 packets and 900-1600 ms.
- Fake Lag creates repeated ping spikes. Infinite runs until stopped. Timed stops after TotalDuration.
- Fake Lag controls include Block Min/Max, Pause Min/Max, Total Duration, and FakeLagKeybind.
Downloads and startup
07Why can't I download the file?
Open your browser's Downloads page, click the three-dot menu next to the file, then choose Save file.
08The compressed folder is empty. What now?
The download may be incomplete. Install WinRAR, right-click Components.zip, then extract it to a folder manually.
09Failed to load DLL. How do I fix it?
Run components.exe and wait until every required file finishes downloading before continuing.
10Which generated file should I run?
Look for the largest file, approximately 17-21 MB, with a shield icon. That is the loader described in the existing guide.
11The loader does not create a new file.
- Connect to a VPN such as ProtonVPN.
- Synchronize the time on your PC.
- Start the loader while the VPN is connected. Turn it off afterward if needed.
12Do I need a USB drive?
Yes. Use a physical flash drive or follow the Virtual USB instructions in this guide.
Virtual USB drive
Use this only when you do not have a physical USB drive.